Monday 29 October 2012

Red Velvet Cupakes


I stole this photo- but don't sue me! It can found here:
http://www.tumblr.com/tagged/red-velvet-cupcakes?before=1350240975
Well, I tried baking again. After the previous cupcake disaster, I thought I swore it off forever. In fact, once you saw this was a dessert recipe, you probably thought to yourself, “Well, I won’t be trusting her again. I’ll skip this recipe and wait for the next one.”

I wouldn’t blame you for that thinking. Frankly, I hardly trusted myself. And when I offered people a cupcake, I could see the fear in their eyes. But! They turned out well. The frosting was a bit of an issue, but we’ll talk about that later. There are no photos, because the sheer anxiety of baking was enough of an issue and I couldn’t then deal with pretty pictures.

Here was my secret for this recipe. I actually took my mother’s advice and took out all the ingredients first and made sure I had enough of everything. Then I took the time to let the butter fully come to room temperature so that there weren’t globs and chucks of butter in the middle of the cupcakes. (As a side note, this also caused my dog to eat a pound of butter, and then be sick. I’m still airing out my house.)

Once I got out to the store and bought a replacement pound of butter, I buckled down and got serious. No music, no TV, no texting. Only serious concentrating on measurements.

Most of the recipes I found called for buttermilk, which I of course had none of, and didn’t want to buy a whole carton for only a cup. I’ve had this trouble with my scone recipe before, but now I know that making cupcakes and scones in the same week (or same milk expiration period) is a good idea. I did find one recipe that said you can make your own buttermilk by adding a tablespoon of distilled white vinegar to milk and letting it stand for 10 minutes, but I have to research the science of that further before I attempt it. To me, that just sounds like a curdled, sour, mess- but who knows. I will try it one day and let you know.

What I did have a lot of was sour cream, because I wanted that for potato pancakes the other day. I found a recipe which called for a cup of sour cream instead of buttermilk, and that suited me just fine. For the life of me, I cannot find that recipe now though. It’s like I dreamed it or something. But I did find a similar one here: http://www.mccormick.com/Recipes/Desserts/Red-Velvet-Cupcakes.aspx.

You need:
  • 2 1/2 cups flour
  • 1/2 cup unsweetened cocoa powder
  • 1 teaspoon baking soda
  • 1/2 teaspoon salt
  • 1 cup (2 sticks) butter, softened
  • 2 cups sugar
  • 4 eggs
  • 1 cup sour cream
  • 1/2 cup milk
  • A bottle of food colouring
  • 2 teaspoons vanilla extract

Let me just take a moment here with this ingredient list and tell you something. They are serious when they say a bottle of food colouring. I used half a bottle because a whole bottle seemed frivolous, and also, can all that red dye #7 be good for you?

Baking seems to really go against my grain, because I still refuse to follow the directions exactly, despite my numerous misfires for not following the directions. Not using an entire bottle of food colouring means your cupcakes will not be “red” velvet. They will be brown or black velvet, as mine were. At least this does not affect the taste or texture of the cupcakes, so that is fine.

This is part where you need to seriously follow the directions, so you don’t over mix the batter and end up with hockey pucks. First, preheat your oven to 350°. Mix flour, cocoa powder, baking soda and salt in medium bowl. Set aside.

 Blend the butter and sugar together in a bowl until fluffy. Then add in eggs, one at a time. Add your sour cream, vanilla, milk and food colouring. (The whole bottle if you want to see red cakes. Seriously.)

Gradually add your flour mixture to the wet ingredients, until just blended. This is where they say, “Do not over mix.” And that would be true. I don’t think they give it enough punch in recipes though. It ought to be in bold and underlined or something.

Put the batter in the cups and bake for 20 minutes. Or until you can smell them and they smell done. Let them cool on a rack completely. Again, do not put them in the freezer as I once did in an attempt to cool them down. Just be patient.

Your frosting is up to you. I used a buttercream recipe, which you can find in the previous cupcake recipe. Where I went awry this time was I made the frosting, put it in the fridge overnight, and then had no patience the next day for it to come back to room temp, so it became a slightly strange texture. It tasted okay, but sadly they were not nearly photogenic enough for this blog.

This recipe also makes about 24-30 cupcakes. That is an excess of cupcakes if you are just one person like me. You will have to give them away, but I trust that yours will be much more aesthetically pleasing than mine, so you won’t have any trouble doing that at all!  
Tuesday 23 October 2012

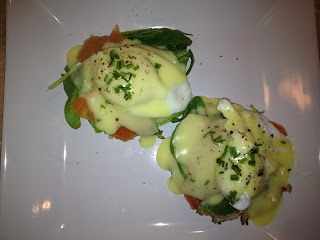
Eggs Dostoyevsky with Potato Rösti

Oh yes, oh yes! 

Breakfast for dinner is just so fun! I always feel slightly rebellious when I do it, like I am breaking the rules of meat and potatoes for supper and just going my own way, a la Stevie Nicks.

Today’s inspiration happened in an unlikely place, in an unlikely way. I was in Shoppers, checking my mail, when I decided I would just grab a frozen pizza or something for dinner tonight. I am so busy at work, I just could not be bothered to cook. Meanwhile, I’ve been going around in this amazingly dramatic poncho that my Auntie Jo bought me for Christmas last year. I feel like Joni Mitchell in it, and like it’s 1977, which delights me to no end, as my Instagram photos would clearly show.

See all that water? You don't want that in your pan. 
Anyway, I’m just minding my own business, walking by the Halloween display, when my poncho catches on the rack of fake eyelashes and nails, and the whole thing rips out of the wall and 87 pairs of glitter lashes and snake nails come tumbling down to the floor. It made this huge racket and of course I was hung up on the display. I had to just pull the poncho as hard as I could and turn on my heel and dash out of there, pretending like I didn’t do anything. This level of mortification, of course, meant no frozen pizza, so I had to legitimately go to the Loblaws. So annoying! (Meanwhile, I should be making ad revenue for Loblaws at this point, because I plug them every time I blog.)

In the end, this was fine because I was just hanging around in the root vegetables when I began thinking about the delicious potato pancakes my mum used to make. Kelly describes this dinner here, and I was thinking that maybe I would like to make that for my supper tonight. But then I had another thought, and that was to make a version of Eggs Benedict on one of those little pancakes.

It all came together then, in a moment of true vision, passion for cooking, and brilliance, if I do say so myself. Also, I was starving, so my creative juices were really flowing.

The start of the pancakes
I like Eggs Benedict, but I like Eggs Florentine better because I don’t like ham. I also really like smoked salmon on my eggs, so why not combine the two? Eggs Dostoyevsky or something, I think they are usually called.

This is a bit of a process, but definitely worth it. It’s great for dinner, but don’t underestimate the power of actually serving this for a weekend brunch too, maybe with a mimosa or two? Champagne at breakfast is always a delight.

Start with some serious prepping here, because I am going to teach you how to poach eggs without a poacher. This is a magical skill you won’t regret mastering, I can promise you that!


This is hard to see, but this shows the ideal boiling for poaching 


Start with the potato pancakes, they are easiest part. Kelly gave a nice step by step in Deli Supper, so there is no need for me to spell it out for you, I’ll just recap.

Grate your potatoes, add an egg and a little flour. You can add onions, but I won’t for this recipe because I don’t want to overpower the eggs and salmon. The one trick is to ensure you get all the moisture from the potatoes out. Being a root of the deadly nightshade family, they will be quite full of water. Try to get them as dry as possible before you add the egg to bind them.

Prepped for the eggs
Fry those up in a pan with some butter. Aim for thin and golden- just like a trip to Monaco. Salt them a little. Put those aside for now and get what you need for assembly, which is fresh spinach and smoked salmon. Two things need to happen now. One is making hollandaise sauce, and the other thing is poaching eggs. Start by filling up a very large pot of water and add a little white vinegar. This will be for your eggs. Turn the heat on it and leave it for now. You don’t want it to be a vigorous, rolling boil, just a gentle boil. So if it gets aggressive in the meantime, turn it down a little.

Now for the hollandaise sauce. Save yourself some trouble, and use a package. If this is a Sunday and you have all day to make hollandaise from scratch, go ahead. If aggravating yourself is not something you are keen on, McCormick and Knorr make two great options. Follow the instructions on the package. When it tells you to let simmer with occasional stirs, now would be the point that you’re going to think about the eggs.

This is what the pot looks like as you are poaching
Get out a slotted spoon and ensure your water is gently boiling. Crack an egg into a cup (this makes it easier for the egg to stay together) and then stir the boiling water until there is a mini-whirlpool in the centre of your pot. You don’t need this to be gale force or anything, just a nice little pocket to dump your egg into. The swirling water will also help to hold the egg together, as does the vinegar you added. Add two eggs, four if you’re a pro, at a time. If you are serving this for multiple people, they are served in stages. It’s just the way it is. Too many eggs cool the water too much and they won’t cook properly, plus it will be hard to do. When you spoon out your eggs, use a slotted spoon so you don’t add a bunch of egg water to your serving plate.
That is a perfectly poached egg!

The eggs will take about 2 ½ minutes to cook to a perfect, runny centre. Don’t touch them. Just let them cook. This is a good time to stir your hollandaise and prep the pancake.

On a plate, place two potato pancakes (I feel like the word “rösti” is coming to mind here) with spinach and salmon on top. When your eggs are cooked, spoon each on to its own pancake. Top with hollandaise, chives if you’re fancy (or if you take pictures of your food to put on a blog) and some pepper. Enjoy them over stories about that time you went to Monaco. 

Thursday 18 October 2012

Cleanse-Friendly Comfort Food


Sweet Jesus, I FINALLY have a moment! Remember that wedding I mentioned a few weeks ago? Well that is happening this weekend. I have the least stressful bride in the world to be a MOH for, (that’s TLC-speak for Maid of Honour!) and yet somehow I am stressed to the bejesus about it.

Mostly I am stressed about my speech. But fret none, my little chefs! I have it written and if I can deliver it not-wasted, then I think we can call that an achievement.

In other wedding news, I obviously want to look great in my dress, and since I tend to turn donuts and hash browns when I’m stressed, I opted to do a cleanse over the past two weeks so I would feel energetic and slim in my little Vera Wang number. (That’s right- more TLC-speak for a SLAMMIN’ dress!)

What does this consist of? Well, it’s more like, what does it not consist of. No dairy, no sugar, no nuts, no alcohol, no caffeine and no gluten. Now, I know what you are thinking, because I thought the same thing to myself, “What the hell am I supposed to eat then?!”

Good news abounds though. Number one, there is no gluten in rice and quinoa (ha! My Mac spellcheck does not recognize this word- get with it Apple, quinoa is the granola of the Millennial generation- half the people who work at Apple probably subsist entirely on the stuff…). Anyway. You can also eat meat and fish, which is easy to do. The biggest upside though, is that goat cheese and goat milk of any variety is permitted. And this means you can make mostly anything delicious.

Craving a Cheese Dream? Of course you are, because they are the most delicious treat that ever existed. So obviously the bagel and cheddar cheese is out, but you can have a brown rice cake with goat brie on top! Trust me, on Day 7 of this cleanse, that will feel like QUITE a little treat for yourself.

This is a 14-day cleanse though, and you can eat only so many brown rice and lentil curries before you find yourself dreading the curry powder. I was feeling like Italian one night, and was in quite a pickle about how I might make a delicious pasta dish when I couldn’t use neither dairy nor pasta. Loblaws (which my friend Kelly once commented that I must go to everyday, which is true) once again saves the day however. They not only carry rice pasta (allowed) but they also carry goat milk yogurt (also allowed- and not as nasty as it sounds. If you like goat cheese, you’ll like goat yogurt.) So now my friends, the magic begins to happen.

Firstly, start your sauce. You need some canned tomatoes or crushed tomatoes (hypothetically citrus is not allowed on the cleanse, but I would be lost without tomatoes). Maybe your mummy is as jazzy as mine is, and cans her own tomatoes, and they taste like they just came off the vine, even though it’s October. Or maybe not. But what you need to do first is sauté an onion all chopped up and some crushed garlic in olive oil (because of course you aren’t using butter on the cleanse). Then once they are delightfully caramelized, you are going to be fancy for a minute. This is where if you’re cooking for someone, it’s beneficial to have him or her in the kitchen so they can think to themselves that you are quite a little chef, and therefore of course, a catch. De-glaze your pan with red wine (I know there’s no alcohol on this cleanse, but I’m pretty sure it cooks off because your pan is going to be quite hot- and anyway, sometimes you need to have a little fun in life) and then let it simmer until it reduces by half.

Now add your tomatoes. Give them a stir and bring it to a simmer. Simmer for as long as you want, the longer you do, the more flavour develops.

Time for the pasta. Bring your water to the boil with salt in it. Rice pasta is pretty much the same as normal pasta, but you REALLY do not want to overcook it. If you overcook it, it becomes a large mass of starch and it won’t be edible. So concentrate.


Drain your pasta and give it a quick rinse with cool water to ensure it doesn’t overcook. (Don’t make it ice cold, obviously. Just a rinse.) Now, take your pasta sauce off the heat and add fresh chopped basil and a spoonful of goat yogurt to make it a creamy sauce. A little stir and voila! You have cleanse-friendly comfort food. If you don’t tell anyone it’s healthy, no one will suspect you. 

Friday 12 October 2012

Chateaubriand

Well friends, here comes my big gun. I was going to hold this one back, sort of like the ace up my sleeve, mostly due to the fact that I knew this was going to be a lot to type and I have an agonizingly painful arthritis in my wrist. But I now realize it isn't getting better any time soon, so best to chop it out now while I can still type. The ladygirls will have to take over the helm till I heal, and God only knows what kind of modern, fusion type fare they'll decide to tempt your taste buds with!

This may be your last Old School recipe for a while to come. You have probably never even heard of this before, it's so old fashioned. But this was always my big one for blowing the roof off the joint. But, like all of my recipes, it's just smoke and mirrors. Lots of razzmatazz on the serving platter, but pretty damn easy if you're organized. I'm going to put out the image now so you can get the idea.
So this is basically a meal that gets served all on one platter with a gravy boat of Bearnaise sauce on the side which your guests will pour over the entire plate including the meat. It is visually stunning and be prepared to spend $50.00 or more depending on how many people you're serving.

It consists of a beef tenderloin served no more than medium rare, surrounded by an assortment of vegetables. I know. It seems like a pretty stupid idea. And unless you've ever tasted it, it is. You can find way more economical ways to spend your money. A sexy new leather purse just to start. But I digress. This meal will seal the deal. Whatever it is you seek, shall be yours if you serve this meal to the powers that be.

So lets get our ass to class. Cooking class 202. You'll need:
Beef tenderloin. The last one I made served 15 people and I used a whole beef tenderloin. Cost $85.00.
So if you buy a 2 pound tenderloin, plan to serve 6 people. Plan on just under a half a pound per person.
Vegetables to surround the meat. This meal is has a visual impact, so plan to have lots of colour.
Baby carrots, asparagus, red pepper, roasted tomatoes, mushrooms and if you like - potatoes. Potatoes are not characteristic to Chateaubriand, but I could never get away with not serving them in my house, so I use them. But I only ever use those small potatoes. They seem much more gourmet to me. Chopped parsley for garnish. Each vegetable has to be prepared on it's own and with lots of flavour.
I told you this was going to be a task. Not so much for you, but for me to type with a sore wrist. Plus you need a Bearnaise sauce. If you prefer to make that from scratch, I can make a separate post for that. But the truth be told, you'll be fine if you buy a package (or 2 if you're serving a crowd) of Knorr-Swiss Bearnaise sauce. I find it tastes every bit as good (or possibly better) than the one I make from scratch. And I only make from scratch if I can get my hands on fresh tarragon.

The meal is all about timing. All of the vegetable dishes need to be prepped before you put the meat into the oven. And you cook them as you go from longest to cook forward. Before I do anything, I par-boil the potatoes (par-boil is cooking speak for don't boil them for long because they're going to be cooked again). So if they're small, then they're new potatoes, so you don't have to peel them. Yay! just scrub them with water and throw them into a pot of salted water. Bring them up to the boil for about 7 or 8 minutes and turn off the pot and forget about them.

The baby carrots are going to be boiled for about 13 minutes and then doused with butter and brandy and kept warm until serving. So be prepared for that. The asparagus can be grilled or roasted or steamed for just about 6 minutes. So snap off the tough bottoms and set them to go with whatever method you choose. Steaming is the easiest. They can just go in small bunches on the platter. No need to embellish because they'll pick up the flavours on the plate.
The red peppers need to be sliced along with a sweet onion and 2 cloves of garlic and they will be sauteed for about 10 minutes in olive oil and salt and pepper. The potatoes will be thrown into the roasting pan with the meat for about 20 minutes. Turn them in the pot to make sure they don't burn on one side. Slice the tomatoes in half and they will sit on a cookie sheet with salt, pepper and Parmesan cheese and a dab of butter and they will roast in the oven for about 20 minutes at 400 degrees when the meat comes out of the oven to rest. And the mushrooms will saute in butter like happy sliced mushrooms are wont to do! Ten minutes will do it.

Phew! Still with me? So, onto the meat then! Since you've spent your pay cheque in beef, let's not screw this up.  I don't own a meat thermometer, so I don't even know how to give you guidance if you were to own one. We're cooking old school here. So here is my formula. 20 minutes per pound plus 20 minutes over, and then 20 minutes to rest. Now most of you probably don't even know what a pound is. So let's say 44 minutes per kilo. PLUS 20 minutes over to rest. I'm not a math major, but if the beef is 2 pounds, then it will cook in the oven for 40 minutes, but don't forget, you do 20 minutes over. Therefore, actually 60 minutes. And it will sit on the counter, covered in tin foil for an additional 20 minutes resting. I will get one of the ladygirls to come in and edit the math for you since I become a brain dead jellyfish when it comes to this sort of thing, and they both have university degrees. BUT I do know this. You will need to have a strong magazine such as a Vogue at the ready to fan your smoke alarm when it goes off because we are going to roast this meat at 450 degrees. Yes. That's right. 450 degrees for the first 20 minutes. Then we turn it down to 425 degrees and throw the potatoes in. Your smoke alarm will go off for sure. But that's just the way it has to be to get the char on the outside that we need. If you are cooking an entire beef tenderloin for 15 people, cut the whole thing in half and treat the cooking time as though it's one piece. ie assume it's 3 pounds and go from there. Some people would say to brown it first on the stove and cook it on a lower temperature from there, but you won't get the flavour and the juiciness. So I don't recommend that way. Plus it isn't nearly as thrilling and high adventure as the high heat method. Rub your meat with butter and add salt and freshly ground pepper and some dried tarragon and place it in a roasting pan and away you go! Keep it in the oven for an extra 5 minutes per pound if you like medium. If you want it more well done than that, skip over this recipe and make a chicken or something else. Put it out on a carving board covered with tin foil to rest, but surround the board with lots of paper towel in case lots of juice flows out. (it will be quite bright red, but don't be alarmed by this. It continues to cook as it rests)

The meat is the star of this show. Prepare all the vegetables using the timetable above. When you're ready to serve, carve the meat into 1/2 inch thick slices, but keep them all together and lay them in the centre of the platter. Pour the sauteed mushrooms over the top and allow the excess butter in the pan to flow over the meat slices. Then portion out each of the vegetables around the meat on the outer perimeter of the platter into groupings of however many people you have. Or six portions at the max. So say carrots, then tomatoes, then asparagus, then red peppers then carrots again and so on all around the platter. And place the potatoes around attractively and sprinkle the whole lot with chopped fresh parsley. Serve the Bearnaise sauce on the side. The outer slices will be more well done than the centre slices, so your guests can choose the doneness to their liking. Serve this meal with the very best, full bodied red you can afford. A Cabernet Sauvignon will do it the most justice.

Now this meal was more typing than actual cooking. It goes fast. The whole meal goes on the table in less than an hour of cooking time. And I must tell you that your guests will be bloody well amazed. You will even be astounded with yourself! I hope this will become your big gun meal too. It's delicious and not difficult. I find it to be much less trouble than a turkey dinner for a crowd. And I pray you have a self cleaning oven! Bon Appetit friends! See you again when my wrist heals and onto more and more recipes soon! xoxo

Friday 5 October 2012

Late Night Onion Rings

Mmmm. It's late and I'm hungry! After all that turkey cooking and entertaining I find myself to be starving. I certainly can't get in the car and drive after all that wine, and I'm sick and tired of potato chips. Or maybe you have a house full of guests and everybody wants a bite, but you don't want to haul out a bunch of stuff and start cooking up for a crowd again. Either way, I've got the perfect snack for you!

I got the idea for this after Rachel Ray posted a recipe a couple of years ago that she called "Late Night Bacon." You put the bacon slices between two sheets of paper towel and microwave them for 8 minutes. Or however long she said. I don't remember. But my oh my! What a good time so many of us had mocking her "recipe"! Yes, this would be the same Rachel Ray that had her own cooking show on television. Could she be serious, or was she just mocking all of us that followed her recipes like disciples? I joined a Facebook group called Late Night Bacon just for the fun of it.

You just never know what surprises life has in store for you. Through that group, I became facebook friends with the most fabulous and wonderful lady I have never met. Smart, funny, talented chef Sandra Jayne. We spent so many nights laughing our heads off until the wee hours of the morning trading stories and jokes. She really changed my life and her humour carried me through a dark time when laughter was the best remedy. She was in the process of opening her own restaurant just outside of San Antonio at the time and in just one year, it has become wildly successful. Four Kings. Go there if you ever get a chance. I hope I get that chance some day.

Now the thing about Late Night Food, is that you want taste and flavour with just what you have on hand. Rachel got that part right. And I have to assume she had a plan for that bacon and wasn't just going to scarf it down slice by slice like those crazy people with the food addictions you see on TLC. (The Learning Channel?) So who doesn't love an onion ring? So delicious and so easy. You may never get take-out again.

Here it is:
Slice an onion up into 1/4 inch slices and pop out all the rings in each slice.
Dredge them in 1/2 cup of flour seasoned with salt, pepper and a dash of cayenne powder.
Mix 1 cup of flour and 1 bottle of beer with a whisk. Add more beer if it's too thick. It should be like pancake batter in consistency
Preheat about 2 inches of vegetable oil in a pot or else heat up a deep fryer if you have one.
Put a drop of batter into the oil and if it rises up to the top bubbling, the oil is good to go. (Could really use a thermometer you know Santa!)
Put all of the onion rings into the batter and take them out one at a time with a pair of tongs and place them carefully into the oil pot. Flip them after a minute or two when they turn golden brown. Remove them as they turn golden on the other side. They only take about 2 minutes.
Drain them out onto paper towel and salt them immediately. Serve them up right away (to your guests or to yourself as the case may be).


You will honestly be surprised how light and delicious these are. Use anything you like to dip them in such as ketchup. I make them when I serve hamburgers and more than half don't even make it to the table. People in the know have learnt to hang around by the oil pot and ask me how my life is going and casually reach over and grab them as they hit the paper towel. I don't think they actually do care how my life is going at all!  And if you really want to take them off the charts, use a Vidalia onion when they come available. Awesome! Really any food is late night food if you're hungry enough. Enjoy!

Tuesday 2 October 2012

Happy Thanksgiving

Well here we are at the last and final chapter of the Thanksgiving trilogy. Getting the meal on the table. You have to do some menu planning yourself at this point. Your turkey, gravy and stuffing will be wonderful, but you still need to think of your vegetable dishes. Now just keep in mind that you're not trying out for an episode of Master Chef here. You're serving people you know and love, and you should know what they like as far as food goes. Oh sure, I've tried to serve up homemade cranberry relish and sweet potato souffles over the years. Only to have my exotic and labour intensive creations come off the table untouched. And full dishes mean empty bellies. Epic Fail! I would be run out of town tarred and feathered if I didn't serve mashed potatoes and plenty of them. New recipes are lots of fun to try out, and I don't discourage that. Just not on this day. Serve what your people love and just make it taste really good!

Another logistical reality is your stove. I am confined to just 4 burners and one oven. So as much as I love roasted squash, the high temperature required to properly bake it would ruin my turkey. I know one burner will be taken with the potato pot. I have three left, so here are my three standards that everybody loves:
Baby carrots with a maple syrup glaze
Steamed cauliflower with cheese sauce
Brussels sprouts with crumbled bacon, brown butter and toasted almond slices.
Easy peasy too.
 In the morning, fry up half a pound of bacon. Or the whole pound and use half for breakfast. Drain and crumble the other half and set it aside.
Toast about a cup of sliced almonds in a skillet. Watch them like a hawk because they'll scorch in the blink of an eye!
Finely chop lots of fresh parsley. This will be used to garnish almost everything. Just to let people know you care!
Prepare all of your vegetables early and let them sit in their assigned pots in salted water so all you have to do is turn on the burners.
Peel and quarter your potatoes. I use 2 potatoes per person and throw in a couple more in case anybody is really hungry. For the Brussels sprouts, chop off the bottom tough stems and peel off any loose leaves. Plan on 4 sprouts per person. Take the leaves off the cauliflower and cut out the stem, but keep it whole. I use a 2 pound bag of baby carrots. That feeds a lot of people.

Here comes the timing part:
1/2 an hour before you plan to eat, turn the potatoes on high heat and let them boil for 20 minutes until you can easily pierce them with a fork. Make sure you have twice as much water as potatoes in the pot, or they are fully covered by at least 2 inches of water. By the time they are cooked, the turkey should be out of the oven. Put it covered with tin foil on a cutting board to rest. Throw away the vegetables and herbs in the roaster if you used a homemade rack. Pour all of your drippings into a big Mason jar.
15 minutes after your potatoes start to boil, turn on your carrots and your Brussels sprout pot. Leave both of these pots uncovered. Covered pots will make these two vegetables taste bitter.
Drain the potatoes and get ready to mash them. I use about 1/2 cup of butter at room temperature and about a cup of milk, or less if you're not doing very many potatoes. I use an electric mixer for this, but some people prefer a hand masher. Use whatever you like. Add a bit of salt and pepper and put a pat of butter on the top. Cover them and set them in your turned off (but still warm) oven.

By this point, your carrots and sprouts should be just about tender. Drain the carrots and add 1/4 cup of butter and 1/4 cup of maple syrup and some pepper. Swirl it all around and put the lid back on and set the pot in the oven with the potatoes.
Melt 1/2 cup of butter in a skillet on Med heat and let it bubble until it turns golden in colour, about 5 minutes. Add your crumbled bacon and toasted almonds to it. Drain your sprouts and add the butter mixture to the pot. Swirl it all around and cover it and set it in the oven with the potatoes and carrots.
Now turn on your cauliflower and while that is steaming, start making your gravy. See why I made another post for that? Am I losing you yet? This is still fun! Gravy needs lots of attention, so you might want to make your cheese sauce early before you drain your potatoes. Silly me.
Here it is:
2 tablespoons of butter melted, 2 tablespoons of flour. Med heat here. Whisk into a roux and add 2 cups of milk and a pinch of dry mustard powder, lots of pepper and a very tiny dash of cayenne powder. When it comes just to the simmer, take it off the heat. Add 1 cup of any grated cheese you like. I like Gruyere, but old cheddar works fine too. The cheese will melt into the sauce,whisk it all up and just put it aside.

By now your carver should be well into the task. People can help you now. Just as the carver is finishing up, put all the vegetables into serving bowls. Sprinkle the carrots and potatoes with the parsley for garnish. Serve the cauliflower still whole and pour your cheese sauce right over the top of it. Sprinkle with a bit of paprika for garnish. It will break apart easily with a spoon if you've steamed it for about 15 - 20 minutes.
Be sure to remember dinner rolls and cranberry sauce or the people will be quietly looking all around the table for them, but will be too polite to ask. I can't tell you how many times I've forgotten to serve the cranberry sauce, only to see it in the cupboard a week later. And when I mention it, I find out they were all talking about how I missed that, so the dinner wasn't perfect!

Serving up Thanksgiving dinner is so much fun and everybody will help you get it on the table. Oh and just while I think of the table, this is the day to bring out your very best stuff. Linens and china if you have it. Wine glasses and flowers too! Take the time to set a beautiful table. The more attention to detail you pay, the stronger your message will be. Which is this "I treasure each and every one of you. I am proud to have you at my table. And most of all, I am thankful to share this day with all of these people that I love."
Bon Appetit and Happy Thanksgiving friends!

Monday 1 October 2012

Turkey Stuffing

So here we are back to part two of the turkey dinner extravaganza. The gravy is nailed, but the stuffing will be your legacy for all time. There are hundreds and hundreds of different ways to make stuffing, so you just have to experiment and find the one you like. Mine is pretty basic as far as stuffing goes. Some people put sausage in theirs, or chestnuts or giblets and what have you. I always make my stuffing first thing in the morning on the day I cook the bird. I keep it pretty basic because I have so many other vegetables to prepare and the table to set and it takes much longer now to fix myself up than it did 30 years ago. So the stuffing has to ultimately pay the price for that I guess.
So your turkey is fully thawed at this point. Rinse out the cavity and douse it with a bit of salt. Turkey has to cook on a rack so the juices can flow out. If you have a proper turkey roaster with a rack, that's fine and use that. I prefer to make my own rack because it adds so much flavour to the drippings. I simply lay whole unpeeled carrots, celery stalks and halved onions to the bottom of the roasting pan so the turkey will sit directly on them.
For the stuffing, you can either tear up a loaf of bread into bite size pieces, or sometimes I can buy a big bag of crusts at my grocery store. That's the best if you can get them. But please, I beg you not to use any of those stove top stuffings in the box. This is your day to shine, so no cheating. Plus you'd need several boxes of stuffing to feed all the people and that would be expensive.
Tear up your bread into the largest bowl you have. Add a finely diced onion, 3 stalks of finely diced celery and two peeled and diced granny smith apples. Add a tablespoon of salt, lots of freshly ground pepper, 2 teaspoons of poultry seasoning, 2 teaspoons of dried sage and 2 teaspoons of thyme. Mix everything around and moisten with some lukewarm water, just to make the stuffing moist, but in no way should it be wet. So just add a little water at a time. Smoosh in two tablespoons of room temperature butter.
Now the turkey has two places that hold stuffing. The main cavity of course and there is also a hollow spot in back of the bird that has a flap of skin over it. Really investigate this because often they put the giblets in a plastic bag in this spot, and you don't want to roast the turkey with this bag inside!
Stuff the cavity tightly and then the backside. Fold the skin back over this section and tuck it down under the bird.
Preheat your oven to 350 degrees. Lay the stuffed turkey on the rack and salt and pepper it liberally all over. Advanced turkey roasting people will add their own touch at this point. You can insert fresh sage leaves under the skin, or lay some bacon strips over the top. Lots of options. But let's just salt and pepper this one and dot it all over with pats of cold butter. Put a couple of bay leaves into the bottom of the pan and if you have any fresh sage or rosemary, you can lay that down in the pan too. I put just a cup of water into the bottom of the pan too so nothing burns. Cover it tightly with tin foil and put it in the oven.
Your roasting time will depend on the size of your bird, so follow the directions on the packaging. But keep it on 350 for only about an hour and then turn it down to 325 degrees and remove the tin foil. As soon as you start to have drippings, baste the turkey at least every half hour.
It usually takes an average of 4 hours to roast a family sized turkey. I can usually tell when it's done because it will smell marvellous. It will be very, very dark golden brown and your drippings should be a dark golden colour too.
Timing is everything when it comes to getting everything on the table at the same time and you get a break here because once the turkey is cooked, it is imperative to let it rest for at least 15 or 20 minutes. Then you can buy another 15 minutes because whoever you appoint to carve the turkey will make a career out of it. Or at least that's the case in my family. It's serious business, and you'd think they were performing surgery. Talking and visiting all the while and stopping to have a sip of wine and so on. I usually have to scold my carver to speed it up!
I've made enough turkey dinners over the years that I can do it blind folded by now, but there are VERY important food safety rules to follow. I cannot stress that enough. Turkey is fowl, so just as preparing a chicken, you MUST wash your hands with soap and water every single time you touch the bird. And do not touch anything else in the kitchen until after you've washed your hands.
You MUST disinfect your cutting board and all surfaces that may have come in contact with the raw bird before you begin to prepare any of your vegetables. You MUST remove all traces of stuffing from the carcass if you intend to keep the leftovers attached to the bird. I don't even take the chance. I put my leftover stuffing covered in a separate bowl in the fridge. And I remove all the meat from the carcass and keep that in the fridge, covered and separate as well. I always make turkey soup with the carcass after the dinner, so best to remove the meat. This dinner is going to be your victory dance, so there is no point in not being meticulous with your hygiene and having all of your guests ending up in the hospital!
Well that's enough to think about for today. Next post, we'll tackle the vegetables! Believe me, you'll thank me for this after Thanksgiving. Cheers!